

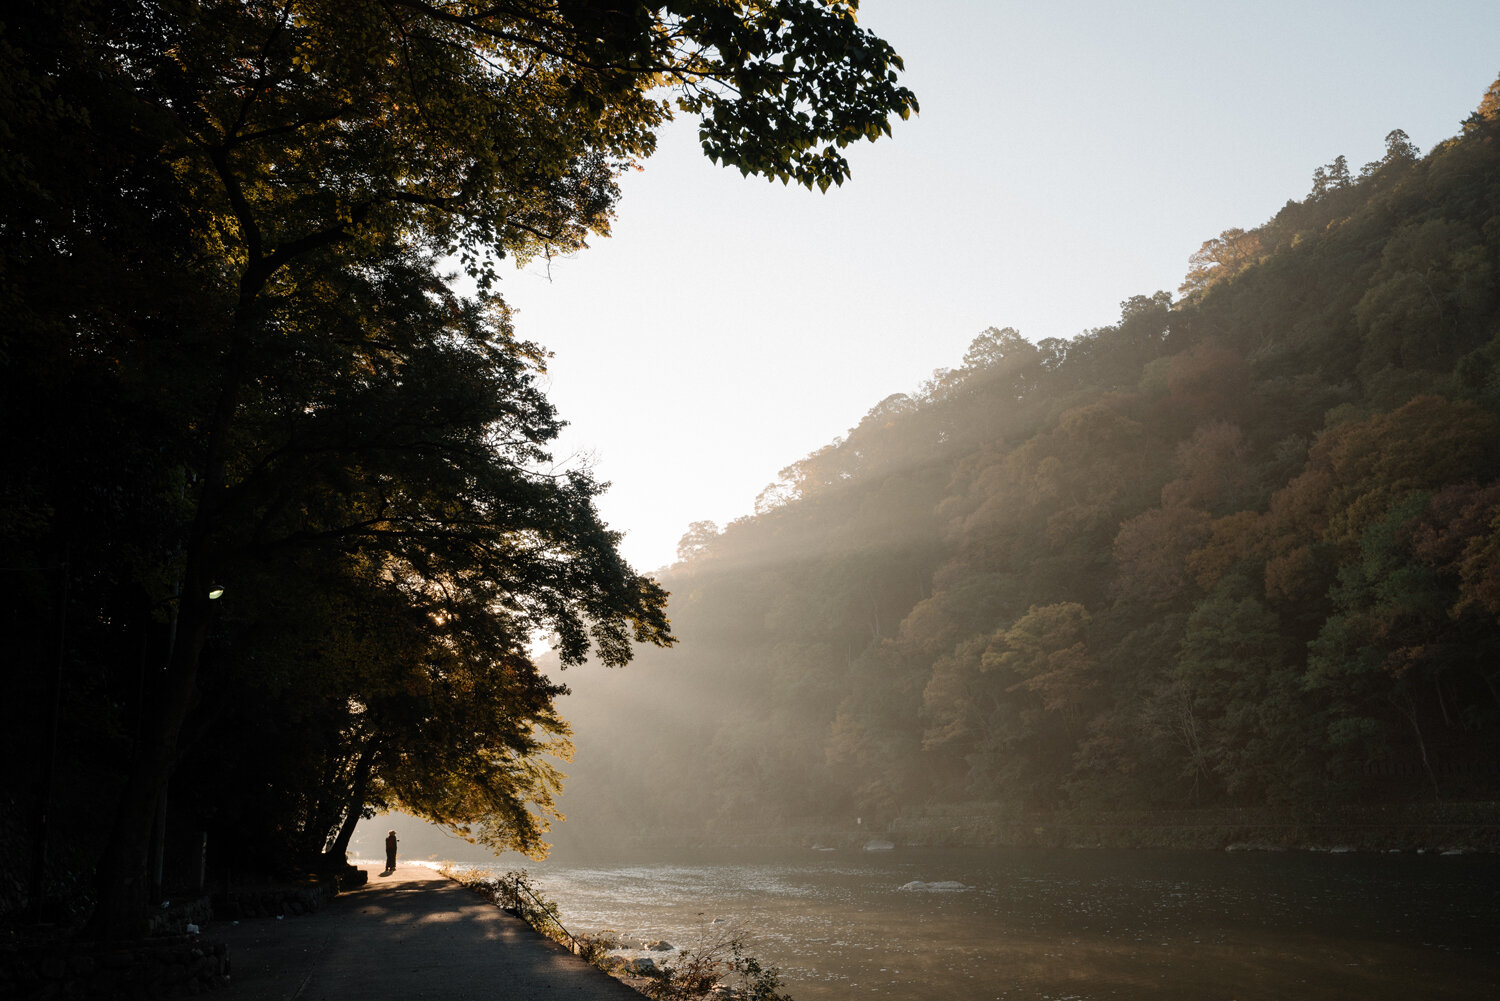
How To Instantly Improve Shooting In Natural Light
I know what it’s like to be in the kind of situations where it is raining all day long and the sky is ultra-dark even when the sun is at its highest. I understand how hard it can be to get beautiful looking shots when you’re in an open field with no way to control harsh mid-afternoon sunlight. I’ve shot in pretty much all weather conditions at any given time of day, trust me when I say that while it can be tough, you can get great images no matter what kind of natural light you’re working with.
“Wow Sam, an article on how to use sunlight to get nice images? How original.”
I know, it may sound like I’m scraping the bottom of the barrel for ideas here, but please give me a chance! Figuring out how to make the most of shooting in natural light is a key part of learning to become a successful photographer or videographer. But I want to take it a step further than other posts you’ve read on this and tell you how to make the most of natural light in any weather situation, at any time of day.
Yes, that’s right! I want to actually tell you more than simply just ‘shoot at golden hour’ or ‘wait for the light to be right before shooting’. We don’t always have the time to hang around all day for a break in the clouds or maybe your shoot doesn’t work at sunrise or sunset.
I know what it’s like to be in the kind of situations where it is raining all day long and the sky is ultra-dark even when the sun is at its highest. I understand how hard it can be to get beautiful looking shots when you’re in an open field with no way to control harsh mid-afternoon sunlight. I’ve shot in pretty much all weather conditions at any given time of day, trust me when I say that while it can be tough, you can get great images no matter what kind of natural light you’re working with.
So where do we start?
Control The Natural Light
Right now you’re probably thinking ‘But how am I meant to control the sun?’, and I can completely understand why you might think it’s impossible, I used to think the same.
But what you actually want to do is take a look at wherever you’re shooting, whether it’s indoors or outdoors, and observe where the light is coming from, the surfaces it’s hitting, what it’s possibly reflecting from, and any pockets of light and shadow that are being created.
It’s a lot to try and ‘read’ from your scene all at once, but it’s an important skill to learn. Having this skill allows you to decide on the spot where is best to place your subject and what angle you want to film from.
Being able to make these decisions quickly effectively then frees you up to begin figuring out what light you can begin subtracting from your image to get a good balance of contrast and shape in your shot.

For example, if you are shooting outdoors in a busy urban area just after midday you can bring your subject into the shadow of a building to give more even light across their face. Alternatively, you could position them with a large wall or window off to the side to bounce light across their face to add shape to the image.
On dull days with grey skies, you may find it more difficult to add contrast to your image as the clouds essentially act as one huge softbox throwing even lighting everywhere. Instances like this are very tricky to deal with (even though they’re really common here in the UK and Ireland) but you can mitigate it and add contrast back into your scene by moving your subject to the edge of soft shadows being cast by trees or overhangs on buildings. You can also use this as a time to experiment with finding areas of good colour contrast to help make your image more dynamic.
Making the most of natural light while shooting indoors is in some ways more limiting but it can be easier too, as windows become your source of light.
Window light is fantastic as when positioned to the back or side of your camera, it acts as a great key light for your subject. The light roll-off in-camera can look fantastic too, allowing you to get amazing looking shots, with great contrast across the image, using fairly little effort. The drawback is that, unless you can rotate the building you’re in, you are stuck with whatever position the windows are in. In cases where your room design isn’t great this can feel like a really limiting factor.

If you are struggling to get the right balance in your image by trying to rely on your surroundings then it’s time to figure out how you can begin shaping the available light. In cases like this, you will either need some extra helping hands or additional time before your shoot to set up everything you need to shape your light.
Using a 5-in-1 reflector to diffuse, add, or take away light from your shot is a great way to shape your light if you are on a run and gun kind of shoot. I try to avoid using the silver and gold sides of the reflector if I can help it as the light that bounces back from them can look artificial. I prefer using the white side to reflect light, and the black side to act as a negative fill to add more shape and contrast to my subject. Ideally, the bigger your reflector is the better, having a larger surface makes it easier to catch the light to bounce back and it also means you have a larger source of diffused light if you remove the outer layer.
Aside from using reflectors, you can shape natural light how you would with artificial lights, by using flags and scrims to block, bounce and diffuse the light. Depending on the amount of light and time you have available this is a fantastic way to make your image look really professional.
Choose appropriate locations for the time of day
This may sound obvious, but if you are working on a shoot with only daylight, you should structure the production around what locations will look best at a particular time.
For this to be pulled off flawlessly, you absolutely have to put in the effort in your pre-production to make sure you not only know what each location looks like at what time but also to have backup locations in case your weather and lighting weren’t what you had originally planned.
There’s no point in showing up to a location at the wrong time with the wrong weather and shooting sub-par shots unless you have no other choice. If you can, take the time to do a recce and actually see how each location looks. Keep an eye on weather forecasts and use your best judgement on how a particular spot will look in the lighting conditions you want.
It’s not always possible to plan for every eventuality, but knowing where else you can go and how to deal with poor light could very well save your shoot.
Work With The Weather
Following on from the previous tip, we can’t always expect sunshine and work with beautiful golden light from sunrise and sunset (unless you live in California apparently) so you will have to do your best to work with whatever weather conditions are available.
Despite your best efforts, you can’t always get the same weather and lighting conditions that you had during recce’s and you may be unable to postpone or reschedule a shoot. It will be times like this that you have to roll with whatever nature throws at you.
Here in the UK and Ireland we almost always have some form of full or partial cloud cover that can change the available light very quickly, which can make getting consistently lit images a pain. Thankfully, it does mean that we are very well equipped for understanding how cloudy days affect the light that we have to work with.
On very heavily clouded days it is like working with a gigantic soft light source, which can be great for portrait shots that give beautiful even light on a subject's face. The drawback is that there is very little contrast in the image, meaning we have to either bounce light back or use negative fill to remove the light from the scene to add more depth to the image.

If you live somewhere with constantly changing weather conditions then I highly recommend installing a weather app that can give you highly detailed readings of the ebb and flow of cloud cover. I have one installed on my phone that breaks down the weather into 5 minute chunks, showing me (with really good accuracy!) when we will have a break in rain and clouds. Having this information is crucial to being able to rearrange a shoot schedule and improvise other shots while you wait for a window of opportunity for the lighting conditions you actually want.
In the cases where you know there is zero possibility of your ideal lighting conditions appearing, then you will have to carry on the shoot regardless. Do your best to shape the light you have and try to reframe shots. Don’t be afraid to deviate from a shot list if it helps light your subject better and adds more to the depth in your image.
Backlighting and side lighting
Backlighting, backlighting, backlighting. This is the secret to how Hollywood productions look the way that they do. Once you know the formula you will see it in almost everything you watch.
Placing your main source of light, whether it’s natural or artificial, behind or to the back and side of your subject casts shadows towards the camera, adding shape, texture and helps add to the film-like feel of a shot.
This is especially useful when shooting in natural light because it not only adds shape to your subject, but also helps add contrast to your image, allowing your viewer's eye to pick out the areas of the image that are the most important.
But the benefits of backlighting your subject don’t end there! If your subject is a person, placing the key light behind them allows them to face the camera without being blinded by bright sunlight. This is particularly useful if they are delivering a line to the camera, or lined up for a group photo.
Positioning yourself so that the sun acts as a backlight also allows you to quite easily bounce light back towards your subject while still giving them a rim or hair light to separate them from the background. Using this effectively can completely transform the look and feel of your image, taking it from a good shot to a great shot.

Taking this a step further, when you begin to add and subtract light using bounce light and flags to shape the light, you will want to try to create a series of dark and light zones in your image.
The human eye is naturally drawn to looking in places of high contrast first, doubly so if there is a face to look at, so crafting and shaping the light in your image to go dark-light-dark-light-dark frames your subject and draws your viewer’s attention to what is the most important in your image.


Best Camera Bags In 2021 - Bags to carry your camera equipment for every budget
Finding yourself with too much camera equipment and not enough hands to carry it all? Then what you need is a top-notch camera bag to keep it all in! There are hundreds of bags on the market to look at, each with varying styles, sizing and uses. You can be 100% sure that the perfect camera bag for you is out there somewhere!
Finding yourself with too much camera equipment and not enough hands to carry it all? Then what you need is a top-notch camera bag to keep it all in! There are hundreds of bags on the market to look at, each with varying styles, sizing and uses. You can be 100% sure that the perfect camera bag for you is out there somewhere!
With so much choice though it can be hard to come to a decision. So we’re here to help you narrow your list down with our top picks for camera bags in 2021!
best camera bags in 2021:

Yuhan DSLR Backpack
Best for beginners

Peter McKinnon x Nomatic Backpack
Best for travel

Lowepro ProTactic 450AW II
Best for professionals

Peak Design Everyday Backpack
Best for versatility

ThinkTank Retrospective v7
Best for weddings

Duragadget Backpack
Best budget camera bag

Lowepro Powder Backpack 500AW
Best for adventure
If you are looking for a more detailed analysis on why I chose these camera bags as the best to use in 2021 then keep on reading!
There are a lot of different aspects to consider when buying a bag. Your style of shooting, how much equipment you have, and your lifestyle will all play a part in making your choice. To be perfectly honest, there is no such thing as a perfect ‘one size fits all’ solution when it comes to camera bags as everyone has their own tastes and personal needs when it comes to choosing a camera bag. That said though, I think some of these bags are as close to perfect as they can be! At least they are for me anyway!
As you’ve seen already, I have tried to cover a multitude of different styles, professions and needs with the list above so let’s jump right into why I think these bags are perfect for their niches.
Best Camera Bags In 2021
Yuhan DSLR Backpack
This canvas backpack is in my opinion a fantastic starting point for any beginner photographer or filmmaker. It’s lightweight, fairly durable and crucially has two different main compartments built into the bag. The bottom half for your camera gear and the top half for everything else.
Why is this so important? Well, it means you’re able to easily access your camera gear while still being able to bring along other important items like food, lightweight raincoats or anything else you might need!
There are also straps on the bottom of the bag to attach a small tripod or gimbal to.
The drawbacks of this bag are that the construction of it means that your equipment probably will begin to cause strain on the seams as you upgrade over time. Professional lenses and cameras weigh more than ones aimed at beginners and hobbyists so this camera bag may not provide all the protection that you would like for higher end systems.
However, as a beginner, this bag will encourage you to be able to bring your camera plus an extra lens or two, along with whatever else you might need for a daytrip, light hike or a short shooting session. Being able to bring more than just your camera equipment will make every shoot you have more enjoyable, and the more fun you have the more likely you are to keep practicing and learning!
If I were starting out from scratch then this would be the bag I would get without any hesitation.
Best for beginners
Yuhan DSLR Backpack
Peter McKinnon x Nomatic Backpack
If you don’t know who the Youtube sensation Peter McKinnon is then I HIGHLY recommend that you check out his channel. He’s the perfect blend of entertainment, fun and knowledge. But this isn’t about Peter, this is about the bag that he created alongside camera bag manufacturer, Nomatic.
Just as with the previous backpack, this one has two main compartments, however, it is split into a front side and a back side. This kind of design is absolutely amazing for two reasons. First, it means that you can fit larger and heavier camera gear into your bag, and secondly, it keeps your camera equipment safe from damage, dirt and even makes it more secure as the camera compartment opens from the back.
This bag was designed with world travellers, YouTubers and professionals in mind as it ticks almost every box you could possibly want. There is more than enough room for all your equipment, the front facing compartment is perfect for storing and compressing additional clothing into, the build quality is fantastic and there are side zips to help you get to the gear you need quickly. For me, this camera bag is as close to perfection as it can get.
The downside? It’s pretty pricey, almost always out of stock, and there are a lot of other neat additional extra features that don’t come with the bag as standard so you’ll have to pay extra for those… If you are serious about becoming a professional photographer, YouTuber or filmmaker though then I reckon it’s worth investing in this bag.

Best for travel
Peter McKinnon x Nomatic Backpack
Lowepro ProTactic 450AW II
When it comes to fully protecting your camera gear you genuinely can’t go wrong with this bag. The Lowepro ProTactic 450AW II (that’s such a mouthful) is tough, built like a tank and is the perfect size to bring along to almost every kind of professional shoot you might have. The internal dividers of the bag are very easy to move around and reconfigure to whatever layout works best for your equipment.
The camera bag opens from the back, perfect for keeping your gear extra safe and making sure you don’t get the straps and back of the bag dirty when you access it. It also can store small, easy to access things in the side panels of the bag. The ‘webbing’ on the front of the bag is also perfect for modifying and attaching tripods, gimbals or anything else you might need to it.
I own the older version of this camera bag and it has lasted me well over 5 years of constant use. It’s been brought into busy cities, lugged up the sides of mountains and has been squeezed into more overhead cabin bins than I can count. And throughout all that it has kept my camera and lenses safe, dry and damage free. It’s about as purely functional as a camera bag gets!

Best for professionals
LowePro ProTactic 450AW II
Peak Design Everyday Backpack
This bag is probably my most used bag of all time. It is almost perfectly designed for the way that I shoot when I am working on personal projects, travelling for fun or off on a daytrip. The Peak Design Everyday Backpack comes in two sizes, a 20L size and a 30L size. I opted for the smaller 20L size to force myself to carry less equipment and become more creative with the limitations of not having all of my equipment at hand, and I’m glad to say it worked perfectly for me!
It may seem strange at first but the layout of this camera bag means that you don’t have access to everything all at once by opening one compartment. The access points are at the top and at both sides of the bag, meaning you have to decide what equipment is important to have at hand and place it near those openings. It takes a little getting used to but it makes accessing your equipment much faster when you can swing the bag off your shoulder, open the magnetic lock or unzip a side and immediately grab what you wanted.
This small, strange bag is honestly one of the best designed and durable backpacks on the market right now and it can be used for a multitude of different things. As I’ve said, this bag is almost perfect for my personal needs and has been able to put up with everything I’ve thrown at it so far, including protecting my camera equipment when I wipe out while skiing!

Best for versatility
Peak Design Everyday Backpack
ThinkTank Retrospective V7
When it comes to weddings it’s not really practical or comfortable to use a backpack to store your equipment. When you’re shooting in a fast paced, live environment like a wedding you only have seconds to react to capture what could be a beautiful moment. As such, we’re changing from backpacks to a shoulder bag for this one!
Any wedding photographer or filmmaker will know how important it is to have their gear with them at all times. It is literally the difference between getting a shot or not. So that’s where the Think Tank Retrospective 30 comes in. This canvas style shoulder bag has a deceptively large amount of room for a bag that goes over your shoulder. It works better with mirrorless cameras as you can fit more bodies with a lens in however there’s still plenty of space for DSLR users too!
Aside from the main compartment where the cameras and lenses live, there are also plenty of other pockets and compartment for storing batteries, camera card cases, audio equipment, flashes and there’s even room for a laptop!
While you probably will still want to fit more stuff into your bag (I know I always want to have more with me on a wedding day) the Think Tank really does strike a good balance between bringing what you need and still giving you room for all those little extras.

best for weddings
Thinktank Retrospective V7
Duragadget Backpack
If you have looked at all of the other camera bags on this list and despaired at the price then don’t worry, I have you covered. This camera backpack is perfect for beginners and hobbyists on a strict budget!
The Duragadget camera bag is a great, cheap alternative to spending big money on camera bags while you’re still finding your feet with photography and filmmaking.
As with pro level camera bags, you are able to move the internal dividers to fit and accommodate all of your camera gear so you can keep rearranging them as your collection of lenses and cameras grow! There are mesh pockets and additional zipped compartments for holding your batteries, accessories and anything else you might need, as well as adjustable straps to attach a small tripod to.
When I started out I bought a bag very similar to this one and it served me well until I began upgrading my equipment and the bag began to strain under the additional weight. As such, I would only recommend this camera bag for beginners or those who don’t plan on expanding their arsenal of camera equipment any time soon as you will likely outgrow this camera bag very quickly. Between this and the Yuhan DSLR Backpack I would choose the Yuhan as it will likely last you longer and be a much more fun bag to use.

best budget camera bag
Duragadget Camera Backpack
Lowepro Powder Backpack 500AW
If you are planning on taking things to the absolute extreme then all of the bags I’ve mentioned before won’t even come close to cutting it for what you need. If you hear the mountains calling to you and you know that you want to pack your bag, leave your house, hike for several days and come home with pictures most photographers can only ever dream of then you’re going to need a specialised bag to keep up with the demands.
The Lowepro Powder Backpack 500AW is probably one of the most specialised bags on the market right now as it’s aimed at mountain lovers, particularly those who do off-piste snowboarding and skiing.
Rather than think of this as a traditional camera bag you will probably want to look at it as primarily a bag for multi day hikes, with loads of room for your food, clothes, straps for attaching heavy external equipment to, with a few camera bag-like features thrown into the mix.
I own a similar, now discontinued, brand of bag and I can honestly say that having a reliable, spacious bag that puts hiking and adventure first and photography and filmmaking second will be essential in making your big adventures more comfortable and enjoyable.
Every adventure is different so only you will be able to make the best call on what you should be packing but the Powder Backpack is designed so that 50% of the space can be used for non-camera related items. As well as being able to remove the camera compartment entirely should you decide to use it as it’s own hiking bag. It offers back panel access to quickly grab your camera rather than having to unload your entire bag to get to your equipment.
Overall I think this is one of the best adventure camera bags on the market right now.

best for adventure
LowePro Powder Backpack 500AW
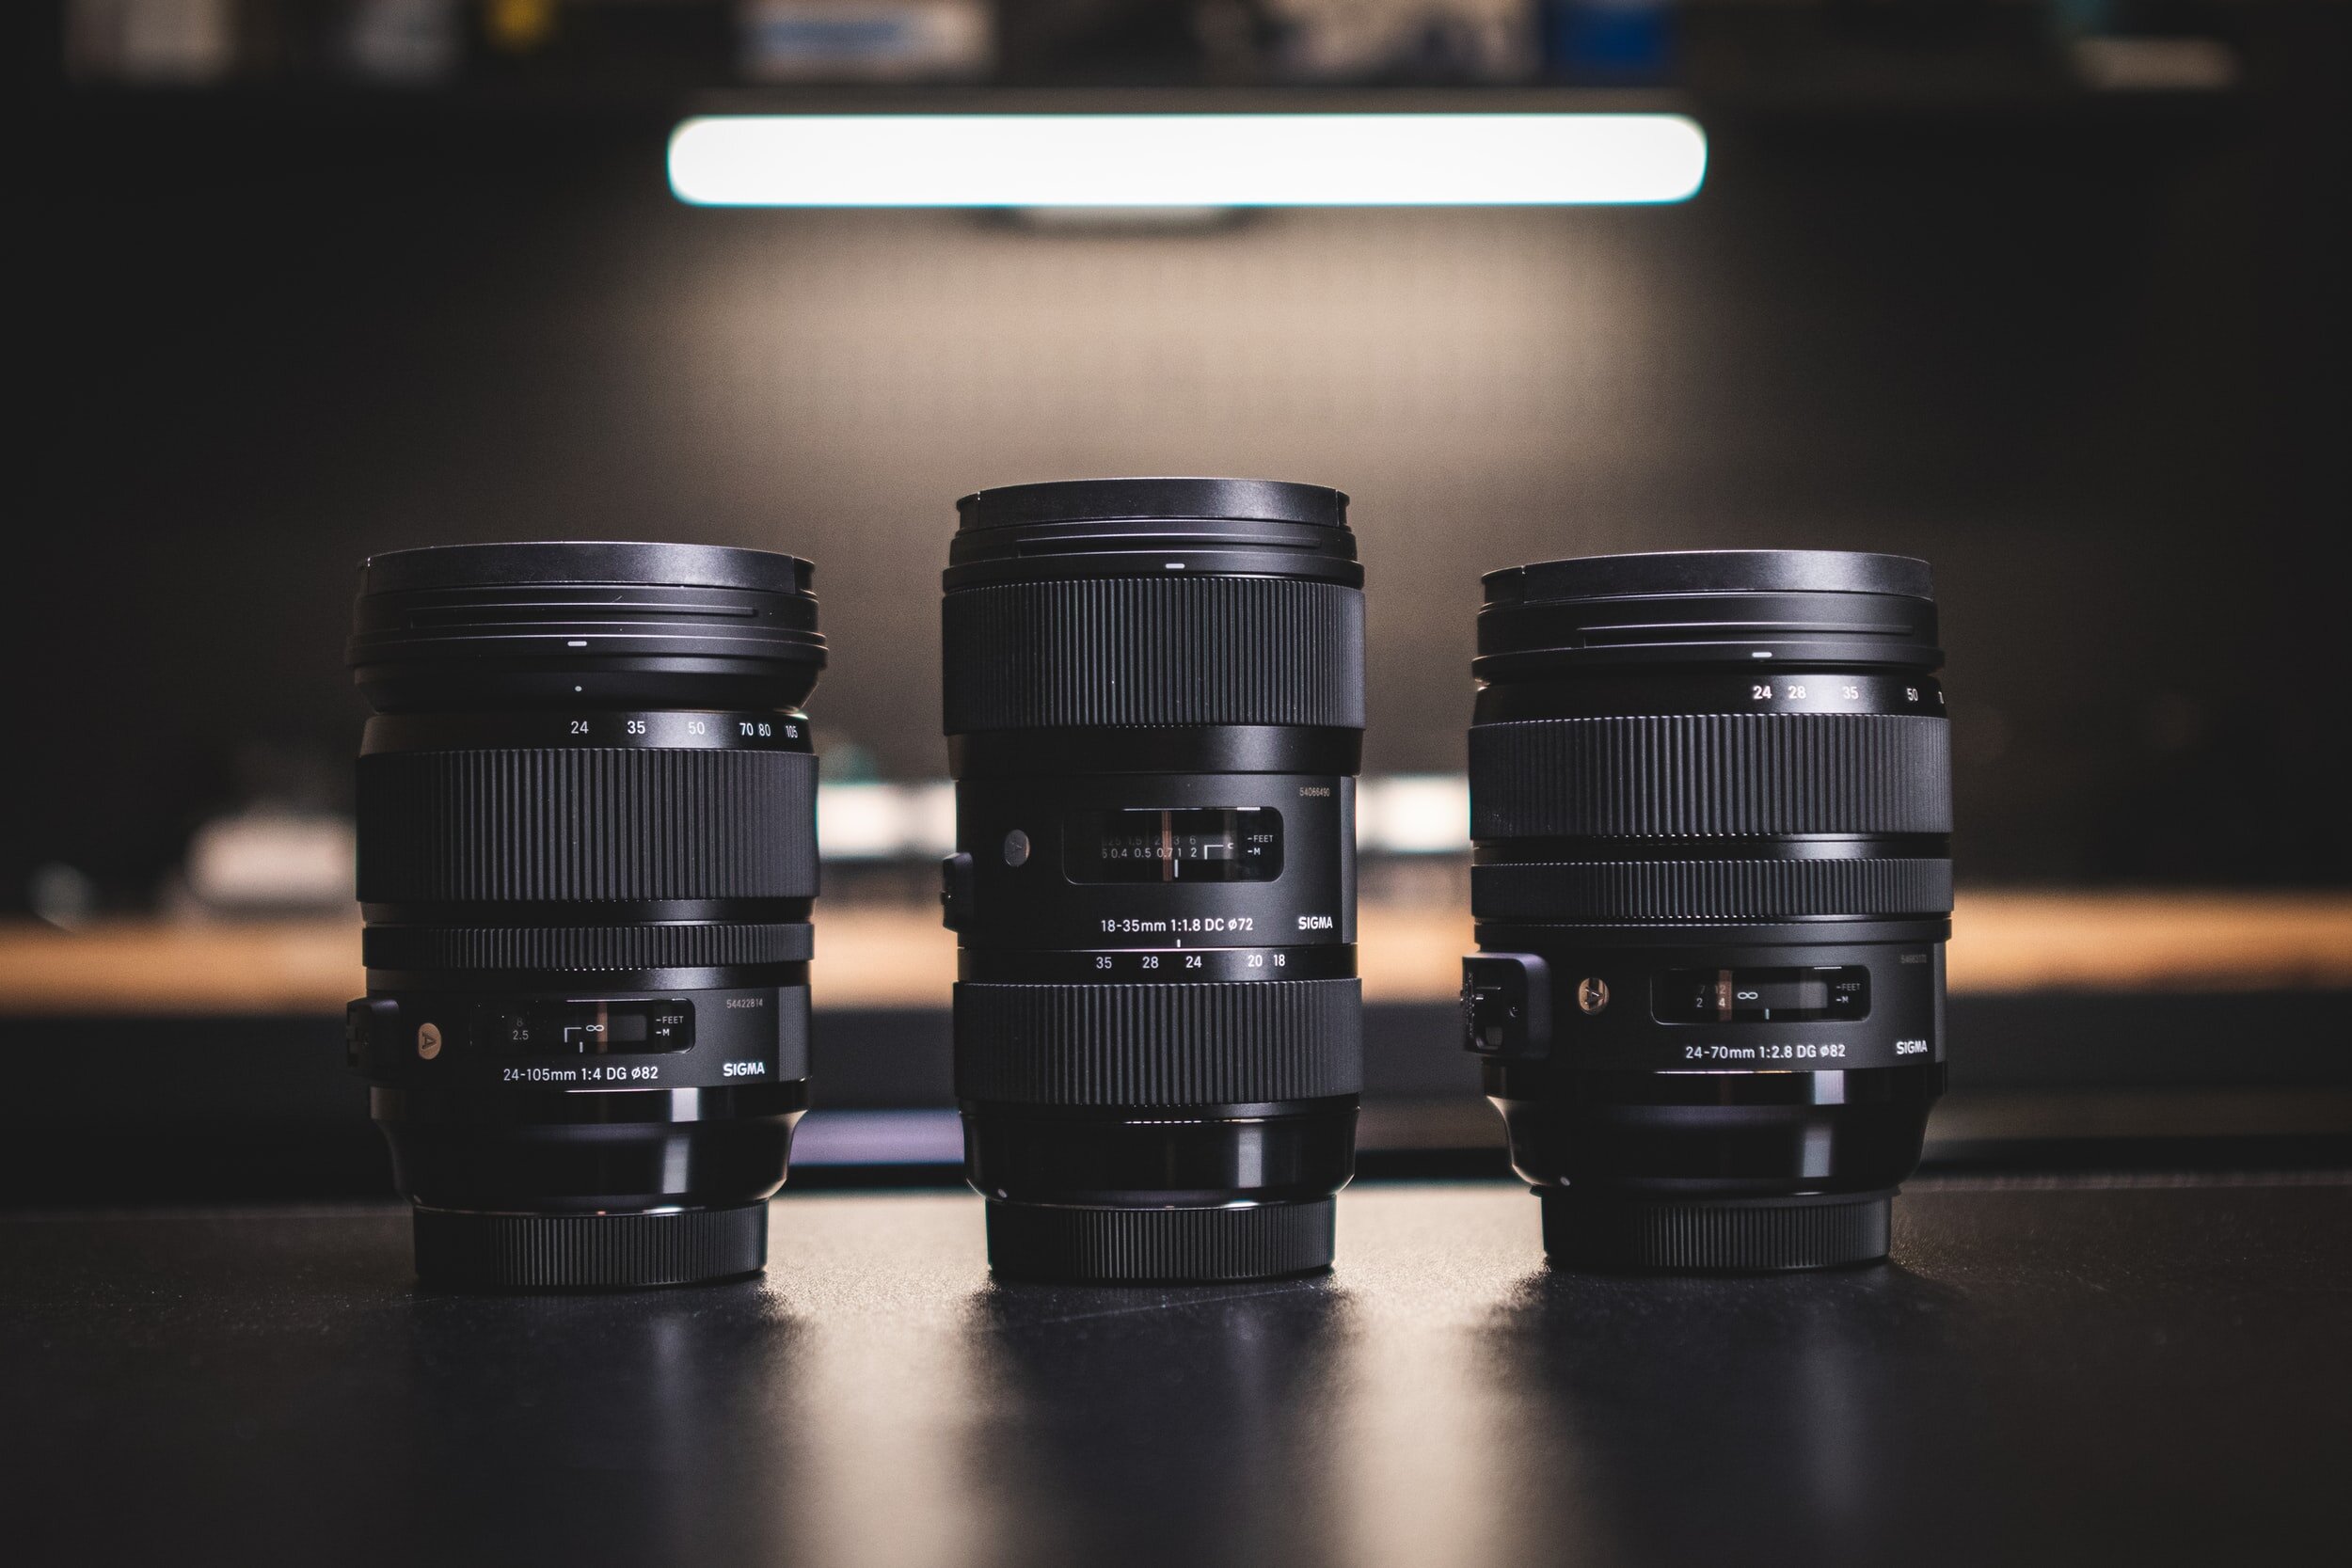
The Beginner’s Guide To Buying Your Next Lens
There’s a lot to cover when it comes to choosing a new lens, so I am here to help you navigate the potential minefield of creative and technical uses of the lenses you will be looking at.
Getting started into photography and filmmaking is such an exciting time. There’s so much to learn and so many new techniques to try. It actually makes me a little envious that I can’t get the chance to go back and re-experience all of that excitement again!
After you decide which camera is best for you as a beginner you will learn and grow with every photo and video you take. Like all art forms, it’s something that can’t be rushed. Take the time to really learn how your camera works and what you love to shoot.
But I’m assuming you already know this! After all, why else would you be reading a guide on buying a new lens?
Before we go any further though I need you to ask yourself one very important question. Why do you want a new lens?
If you just want one because it’s something shiny and new then stop right there and save yourself the money. Buying a lens just for the sake of it will likely end up with you not using it and you won’t get the most out of it.
Discover your ‘why’ first before you rush off and buy a lens you may not be totally happy with.
Knowing what you want to shoot and how you want to go about it is so important. You should only be buying a new lens when your current one is forcing you to compromise or preventing you from getting the shot you want.
There’s a lot to cover when it comes to choosing a new lens, so I am here to help you navigate the potential minefield of creative and technical uses of the lenses you will be looking at.
These are things that are universal to every lens, regardless of the manufacturer or brand. So despite me talking about Canon cameras and lenses all of this information still applies!
The Technical Part
This is possibly the least exciting part of shopping for a new lens, but it is absolutely essential that you understand what it is you’re looking at. Not knowing the sometimes strange technical jargon that’s printed on the side of a lens can leave you with a lens that is useless for your specific camera.
Get the right fit
First and possibly most importantly is to look for the type of mount that your current camera and lens have. Most camera brands have multiple types of lenses designed to fit on different types of cameras, and with the fairly recent rise in popularity of mirrorless cameras, there are more fittings than there were before to deal with.
For instance, if you have a Canon 250D camera that uses an EF-S type mount you can use both EF-S and EF lenses on your camera body. However, if you are using a Canon 5D mkIV you can’t use the EF-S lenses on it. This is to do with how the lenses project the image onto the camera sensors. I won’t go super detailed about it, but basically all you need to know is that it’s important to check the mount type of the lens and the mount fitting of your camera before anything else so that you’re not buying a lens that is useless for your system.
There is usually plenty of documentation about this from your camera manufacturer’s website, but if you’re still not 100% certain it is always a good idea to ask someone who knows their way around a camera. Bonus points if it’s someone who already owns the lens or camera you currently have!
Weight
This is definitely the least sexy thing to be talking about when it comes to lenses, but trust me it makes a difference! It sounds obvious but lenses are really nothing more than a lump of metal, plastic and glass. As a beginner choosing a lens that isn’t too big and bulky and that still fits in your camera bag can make the difference between bringing it with you on a shoot or constantly leaving it behind to save carrying the weight.
If you plan on shooting things at home or in a studio then maybe the weight and size of a lens won’t make much of a difference to you, but for those who want to get into events, wildlife or travel photography then the novelty of carrying around brand new, but really heavy, equipment for hours on end wears off really quickly.
The only advice I have here is just to be conscious of what you want to shoot and try and pick your lens weight accordingly!
Zooms VS Primes
The final technical aspect you will want to consider for your new lens is on if you want to choose a zoom or a prime lens. Right now you most likely have a zoom lens that came with your camera. They are incredibly versatile and give you a lot of creative options when it comes to deciding how wide or tight you want a shot to be.
Prime lenses on the other hand are at one constant focal length. This means that if you want to have a close up of a subject you won’t be able to zoom with your lens and you will have to close the gap between you and your subject by moving closer.
Again there are a lot of creative uses for both of these types of lenses which I will go over soon, but the main thing to note is that a zoom will cover more focal lengths than a prime lens. This means you can react to shots faster, keep your kit lighter and readjust shots without needing to change lenses.
On the flip side though a zoom lens usually doesn’t have as wide an aperture as a prime lens meaning you will have less light available for shooting in low light situations as well as not being able to work at very shallow depths of field.
Knowing the type of images you want to capture will be the main deciding factor in choosing a zoom or a prime lens.
The Creative Part
Here is where things start getting exciting! This is the part where you can start to really figure out what kind of lens will best suit your needs. Knowing what you want to shoot in a creative way will shape the kind of choices you’ll be making as you build up your collection of lenses.
Get the right focal length
But what is focal length? To put it simply, it’s the field of view of a lens. Basically how much ‘stuff’ you can see within your frame.
In general, wide-angle lenses are considered to be anything under the 35mm mark whereas telephoto lenses are considered to be anything above the 70mm mark. Everything in between can be considered to be a ‘normal’ field of view. So this means a wide-angle lens will fit more into your frame than a telephoto lens does, but both have their creative uses!
Wide-angle lenses are usually the go-to choice for people who work in tight spaces, shoot landscapes or want to really exaggerate something. They’re a favourite of sports photographers who can get close to the action, landscape photographers who want to show huge vistas and people who gravitate towards architecture and homestyle photography.
You can absolutely take portraits on these lenses but due to the nature of the lens, it will exaggerate the size of anything near the lens, creating really unique portraits!
On the subject of portraits, many photographers love to use a 50mm or an 85mm lens to convey a sense of beauty to their portraits. These focal lengths, particularly the 50mm, are seen as the most ‘true to life’ lenses as they don’t exaggerate or compress facial features like other lenses do, while still being able to nicely isolate the subject from the background.
These lenses are very versatile for people who are into shooting lifestyle imagery, weddings and anything else that requires a down-to-earth, comfy kind of feel.
Telephoto lenses really come into their own above the 100mm focal length. When working at such high focal lengths you will really begin to see the effects of lens compression in your image. Len compression is simply the background of your image appearing larger and more ‘distorted’ than it is in real life compared to your foreground subject. The higher your focal length the bigger the background elements appear.
This might sound scary at first but it is actually a good thing, especially for wildlife and landscape photographers as it can be used to make the subject the main focus of the image.
Choosing the right focal length for you will really depend on what you want to shoot but to break it into what focal range works best for what type of photography you can use this as a cheat sheet.
Wide-angle - sports, landscapes, architecture, real estate
‘Normal’ range - portraits, weddings, lifestyle, food
Telephoto - sports, landscapes, wildlife, events
These aren’t necessarily rules to follow as you can use any lens to shoot almost any type of photography but it will give you the best starting point to work from to find what works for you!
Why your aperture matters
Next up, you will want to check the widest aperture of the lens you want to buy. This is the number beside the letter f that should be written on the lens somewhere, usually written as f/2.8 or f/3.5-5.6.
These ‘f numbers’ tell you exactly how much light the lens will allow onto the sensor of the camera and make your image brighter at its widest setting. If you’ve ever looked into your lens when changing the aperture on your camera you will notice the metal blades moving inside it.
This is important for a number of reasons. First being that the lower the f number on the lens, the more the blades can open and more light can enter the camera allowing you to shoot in low light situations.
Secondly, it affects your depth of field. Or put more simply, it can make your background and foreground look more blurred out!
The lower the aperture of a lens the more background blur you can achieve with that lens when you open it the whole way up. Doing this is called shooting with a ‘wide’ or ‘fast’ aperture, giving a shallower depth of field, whereas shooting with the lens stopped the whole way down at a ‘narrow’ or ‘slow’ aperture will give a deep depth of field, meaning more of the image is in focus.
So why does this matter for your creativity? Well, shooting at fast or slow apertures really depends on personal taste and the story you are trying to convey with your image. As an example, a portrait photographer might choose to shoot with a really fast aperture of say f/1.4 on an 85mm lens as it will give incredible separation between the subject and the background elements. The plane of focus will be solely on the subject and the background will have a beautiful blurred look to it.
On the other hand, a landscape photographer might choose to shoot at f/22 on a 24mm focal length to make sure that the image is in focus from the front to the back of the image. It all depends on the subject and the message you want to convey.
As a general rule of thumb, lenses with lower apertures are heavier and will cost more money. The best example of this is with Canon’s range of 50mm lenses. You can pick up a Canon 50mm f/1.8 for as little as £120, with the next step up in the range, the Canon 50mm f/1.4 at around £340. And then if you want to go all out and get the pro-level Canon EF 50mm f/1.2 it will set you back close to £1500. As you move up the range you’ll notice that the lenses get bigger and bulkier and that the price tag increases as the aperture decreases.
What this means for you is that if you know that you only want to shoot landscapes and have no interest in portraits or low light photography you may choose to save yourself some extra money by opting for a lens with a higher ‘fastest’ aperture. And vice versa, if you know you will be mostly taking portraits in low light situations then you may want to choose a lens with a low aperture to get the most out of the available light.
As you can see there is a lot of information to take in and a lot of decisions to make before choosing your next lens. It might seem quite daunting, but knowing exactly what you want to shoot before you buy a lens will save you money in the long run.
Other things to consider when choosing your lens will be things like do you want a lens with image stabilisation? Should you spend extra money on a more expensive lens if you’re planning on going professional? How about specialist lenses like macros for larger than life shots, or tilt-shift lenses for architectural imagery?
Ultimately it all comes down to your own personal preference in what you want to shoot and how you want to tell the story of that image.
If you’re still unsure of purchasing a lens that you have your eye on then the best thing to do is to simply not buy it. Find more reviews on a lens or ask someone whose opinion you know you can trust and rely on. The internet is filled with people who leave positive reviews on products they received for free, so you can never truly know what information is good or bad.
Always be skeptical of what you see and read on a new product until you can verify how good it actually is. Brands know the power of influencer marketing and will use it to hype up a product to get it to sell fast.
Get your research on any purchase from more than one place, especially if that place is the reviews section on the website you are buying it from. The staff in independent local camera stores will be able to give you an insight into how a lens can be used, or if you want to do your research from your armchair then look at websites like DP Review and The Digital Picture are great resources. They are huge hubs of information with very active and knowledgeable communities so you will be sure to learn something of value there!
Choosing your next lens can feel like a big decision, but hopefully after reading all of this information it doesn’t seem like such a hard task anymore! Discover your why, lean into unlocking new levels of creativity and enjoy the process of learning all about your new lens!

It's Time To Begin Diversifying Your Creative Skillset
The creative industries are moving so fast that now, more than ever before, it is so important to begin diversifying our creative skillset.
Immediately after graduating university in 2014 and becoming a professional videographer, I removed the safety net of my part-time retail job to force myself to make my exciting new career as a self-employed filmmaker work. I had never felt so free! I was my own boss and I could set my own hours, this was everything I had ever wanted!
That was until I realised that I didn’t know what I wanted to do. What path would I take to begin taking on paid work? What was I going to specialise in to start paying myself a wage?
This will likely be something that every professional in any creative industry will have felt when they began their career. Having specialist knowledge on something can really catapult you leagues ahead from the many other freelancers who are trying to get into the same positions and jobs as you.
However, on the other hand, it can also restrict you from opportunities in other positions you might want to try. For instance, if you follow the route that I took and fully immerse yourself into wedding filmmaking you may find it more difficult to get work on film sets that require you to be available for months at a time.
You will need to figure out for yourself if the trade-off of dedicating yourself to a specialised facet of filmmaking will prevent you from other opportunities later on.
For me, I have definitely found this to be true. Working primarily as a wedding filmmaker for the past six years has been really fun and very rewarding but it has definitely caused me to lose out on some inspiring opportunities. Weddings are incredibly seasonal and are usually at weekends, stopping me from getting jobs for sports coverage or short films where they film on a Saturday and Sunday.
Working weddings means I wear many hats, often all at the same time. I’m a camera operator, audio technician, lighting and set designer, not to mention all the organisation I need to do too to make sure the shoot happens smoothly, and of course there’s all the editing, colouring and sound design after the shoot. I have an excellent grasp on all of the different aspects that go into film and video production, but I am often just seen as ‘the wedding guy’ when applying for work outside of my niche.
All of this is to say that my choice of allowing myself to fall deep into a niche of only one small part of video production as a whole has almost anchored me to my specialisation. It stunted my growth for opportunities in other avenues of filmmaking despite my knowledge of how to pull off a successful project.
This year I have been actively trying to pick myself up and de-integrate myself so closely with weddings by attempting to create ad-spec work for social media. In some ways, I’m trying to rebrand myself as more of a ‘generalist’ within the industry as a whole.
Relearning and repurposing skills like blogging, marketing and SEO to allow me to take fewer weddings, film more of the work I want, and even allow me to pursue some passion projects I had left on a hard drive gathering dust is a very exciting prospect. It sounds like basic stuff, but for me, it’s like a breath of fresh air.
So what exactly am I hoping to achieve by reinventing my skills and my career? Well by beginning this journey as something of a ‘jack of all trades’ I hope to discover a place where I am able to truly enjoy the creative freedom to shoot what I want when I want to. And I think that you should be doing the same. Whether you’re fresh out of studying an arts degree or have been working in the film and TV industry as a freelancer for a while now, I think there has never been a more important time than now to begin diversifying your skillset.
If nothing else, 2020 has been a perfect example of how critical it is to be multi-skilled in more than one area. Governments across the world have implemented lockdowns of varying degrees that have affected different sectors in different ways.
Looking purely at the photography and film industries the number of people who can be on a set at any one time has been significantly reduced, and while it won’t be forever it will stay that way for the foreseeable future. A lighting technician is far more likely to be brought on set if they also have experience as a sound recordist for instance.
Beyond this though it is also important to generalise your skillset for your own creativity and enjoyment. Learning new skills and being able to practice them in real-world scenarios is fun. Gaining the knowledge to do something broadens your horizons and enlarges the pool of experience you have to draw on for future projects.
It may seem counterproductive to any purist filmmaking sensibilities you might have, but learning entrepreneurial skills is likely the best path you can set yourself on. Knowing how to market your work and how to seize the opportunities laid in front of you is going to be the true key to your long term success, not only monetarily but also for your own creativity.
Being able to supplement your income from traditional film and video jobs with that from a business opportunity you took will give you more free time to truly work on what makes your heart sing. And who wouldn’t want to work on their passion projects 24/7?
While it may not be the right path for everyone, I truly do believe that now is the best time for those of us currently in the industry, and those about to enter it, to embrace and adopt the ‘jack of all trades’ lifestyle.
Repurpose the skills you already have and enjoy the process of diversifying what you thought was previously possible. Very soon setting aside dedicated time every week to make yourself more versatile to work on a set or as a freelancer will become the new normal.
The landscape of the creative industries may be changing but we live in an age where it is possible to learn so much in such a short period of time. Embrace the changes that are coming our way and ride the wave of innovation to design the perfect balance between your professional and personal works.

Best Cameras For Beginner Photographers And Videographers
Get ready to take your first steps into the world of photography and filmmaking with these incredible beginner friendly cameras!
Get ready to take your first steps into the world of photography and filmmaking with these incredible beginner friendly cameras!
If you’re in a rush then just take a look at the pros and cons directly below! If you want a more detailed breakdown of what each camera can do then just scroll on a little further!
best cameras for beginners in 2021:

Canon 250D
Pros -
Lightweight, Affordable, Easy to learn with
Cons -
More bulky and heavy than new mirrorless systems

Nikon d3500
Pros -
Very compact DSLR, great battery life, easy to learn with
Cons -
Small viewfinder can take a while to get adjusted to

sony a6000
Pros -
Lightning fast autofocus, very compact, crisp images, highly customisable
Cons -
No touchscreen control, mediocre kit lens, steep learning curve

Canon EOS m50
Pros -
Great electronic viewfinder, easy menu system, fast autofocus, fantastic images
Cons -
4K video heavily cropped, slow autofocus while filming in 4K, battery life could be better

Fujifilm x-t200
Pros -
Amazing look and feel to camera, large touchscreen for easy use, great looking images
Cons -
Generally more expensive than other systems, no image stabilisation, autofocus could be better
Finding the perfect camera to take your first steps with on your adventure into the vast realm of photography and videography can be really overwhelming at first. There are so many different brands, price ranges and terms you have to get to grips with at once that telling the difference between them all can seem pretty much impossible!
The real trick to choosing a camera that works best for you really depends on several factors that you won’t figure out until you are much more experienced as a photographer and filmmaker.
You don’t want to be fooled by all of the camera manufacturer’s technical jargon when making your decision on your first camera. Things like sensor sizes, the number of megapixels and the ability to record in 4k video aren’t necessarily things that will automatically make your camera ‘better’ than other models.
And on that same train of thought, just because something is ‘cheaper’ doesn’t always mean that you’re getting a good deal for the money you’re spending. If you end up outgrowing the capabilities of the camera and need to buy a new one then you will be spending extra money on the camera you probably should have bought in the first place.
So to help you navigate the minefield that is buying your first camera here are the top criteria I think you should be looking for as a beginner photographer in order of importance:
Price
Simplicity of controls
Dedicated manual mode
Range of lenses
The ability of the camera to grow alongside you
If you’re able to find a camera that ticks all of these criteria then you will know you’ve found the perfect camera for you!
Obviously the number one thing to take note of is the price of the camera versus the budget you have set aside for yourself. I would never ever suggest picking up a camera over £1000 for a total novice. You will be so overwhelmed by all of the options that you will probably never take the time to learn how it works. Like every new skill, start small and work your way up!
I personally started making films with a cheap £60 pocket camera which I used for two years before I bought my first ever DSLR, a Canon 550D. I then used that camera for close to five years before I upgraded again. You will discover for yourself when is the right time to upgrade your camera, but for now the best thing to do is just to enjoy the journey of learning all about your new camera.
All of the cameras I’ve listed below are around the same price range as my first DSLR when I got it and are cameras I would highly consider using now if I were to begin my photography and filmmaking journey again!
Best Cameras For Beginners
1 - Canon 250D
This is one of Canon’s cheapest DSLR offerings, but don’t let its price fool you! This camera has a lot of neat features packed into it that will make using and learning with it an absolute breeze. From a photography standpoint the autofocus of Canon cameras is virtually second to none and with the camera’s built-in on screen assistant you will learn very quickly what the camera can do.
The camera will be great at guiding you through everything until you’re ready to try your hand at using the camera in a fully manual setting. Think of it like taking the training wheels off your bicycle as a kid!
This camera was built for simplicity and that’s exactly what you’ll get!
From a technical standpoint the 250D has Canon’s best APS-C sensor, meaning your images will be nice and sharp, have good colours and it will perform slightly better in low light than older models. It also boasts being able to film in 4K if you want to try your hand at videography. You just need to make sure your PC can edit that footage first!
Best Beginner Canon DSLR
Canon 250D
2 - Nikon d3500
Looking through Nikon’s entry-level camera line this camera really leapt off the page at me. It has a lot of very similar features as I mentioned in the previous camera, like the in-camera guided assistant to help you learn what everything in your new camera does, super-fast autofocusing and a fantastic APS-C sensor to boot!
Nikon has made the layout of buttons on the camera very straightforward to understand, and it appears as if their fully automatic photo modes are very good at deciding what you are trying to photograph and will adjust their settings to capture it perfectly.
Cameras like this are perfect for beginners and students as it gives you a great grounding in the techniques you need to use to be able to take great photos yourself.
With that said, I do feel like it would be easy to outgrow this camera quite quickly if you are serious about taking photography and filmmaking from just a hobby to something more serious. Looking at the cost of Nikon’s lens lineup though I feel like this camera ticks all the boxes for anyone who is hoping to have something that is higher quality than just from their phone without going too in-depth into learning photography.
Best beginner Nikon dslr
Nikon D3500
3 - Sony a6000
These days Sony cameras are my go-to for both professional work and for personal projects so it makes it very easy for me to recommend this small powerhouse.
The a6000 is the first mirrorless camera in this list, meaning the lens looks directly onto the sensor that captures the image without the need for the mechanical mirror system in a DSLR. As a result, this camera is unbelievably light and tiny!
It outperforms both the Canon 250D and Nikon D3500 by a longshot in terms of technical specifications and there’s a great deal of customization you can do to have the camera shooting and feeling how you want it to. On the flip side of this though, there will be a much steeper learning curve in using this camera. The menus can feel cluttered and confusing and there aren’t built-in assistants to help you. On the bright side, there are plenty of Youtube tutorials to fill that gap in your knowledge!
One of the benefits of shooting with any mirrorless camera like this one is the fact that they all use a live electronic viewfinder rather than a traditional one. This means you can play around with your exposure settings and see exactly how your photo will turn out before you even take it.
I would highly recommend this camera to anyone who is serious about learning photography and filmmaking, as despite the learning curve this camera will stay with you for a long time before you feel like you need to upgrade.
best sony mirrorless for beginners
Sony a6000
4 - Canon EOS m50
If you were looking for a mirrorless Canon camera that mixed the capabilities of the previously mentioned 250D and Sony a6000 then this camera might be right up your alley!
The Canon EOS M50 combines the simplicity of functionality that Canon is known for in its entry-level cameras while still giving plenty of flexibility for you and your camera to grow alongside each other.
Being a mirrorless camera the M50 also benefits from having an electronic viewfinder that allows you to see how your photo looks before you take it, while still retaining the colour and autofocus that Canon is known for.
While you no longer have a built-in guide you can still find out the information you need online. That is if you haven’t begun to instinctively learn how to use the camera.
This camera is honestly a serious contender for my pick if I were to begin learning photography from scratch again. The video capabilities of the M50, however, leave a little to be desired, not because they’re bad, but because of a very strange limitation to filming in 4K where there is a very heavy crop on the image that isn’t there while filming in 1080p.
Either way, this camera is absolutely fantastic to learn with while still giving you plenty of time to grow into its capabilities.
best canon mirrorless for beginners
Canon EOS M50
5 - Fujifilm x-t200
How a camera looks really shouldn’t be important in choosing your first camera, but I’m going to be perfectly honest and say that the Fujifilm X-T200 is the coolest looking camera on this list.
It looks like the retro film cameras from a bygone age but with enough of a modern flair that it's the kind of camera that will actually make you feel like a photographer.
Just like the previous two, this camera is also mirrorless and will give you all of the benefits that come with it.
The X-T200 differs from the previous two cameras in how it approaches its layout, however. Choosing instead to have fewer buttons on the back of the camera to allow for a larger, flip-out touch screen. The buttons you would have had on the back are now either operated by the touch screen or by using the dials on the top of the camera.
While it could take some getting used to, these dials add a more photographer-like feeling when using the camera.
Additionally, the camera has autofocus that is on par with the Canon M50 and Sony a6000, so the gap really is closing in on which of these three would best suit your needs.
From a video perspective, this camera competes with the a6000 with its 4K filming and leaves the M50 behind in the dust. So it really does depend on what you plan on using the most with your camera.
As the most expensive camera on this list I would definitely recommend the Fujifilm X-T200 only to those who are already 100% certain they will be putting in the time and effort to learn how the camera works. I would say it has great potential to help those just starting out and learning the basics with its automatic modes and has incredible flexibility for when you are ready to start learning to use it manually.
best fujifilm mirroless for beginners
Fujifilm X-T200
ABout Sam

Sam is an experienced filmmaker, photographer, and editor with over 6 years experience working professionally in the media and creative industries.


